Prosol

Excellence in blogging.

Showing posts with label Internet. Show all posts

Tuesday, 30 November 2021

How to connect your hidden wifi to your android device.

Trick to hide your Wifi network

Do you want to Hide your Ptcl WiFi Wireless Signals from unknown devices, If yes then through this informative article you will be able to know that how to hide Wireless access point of your PTCL device.
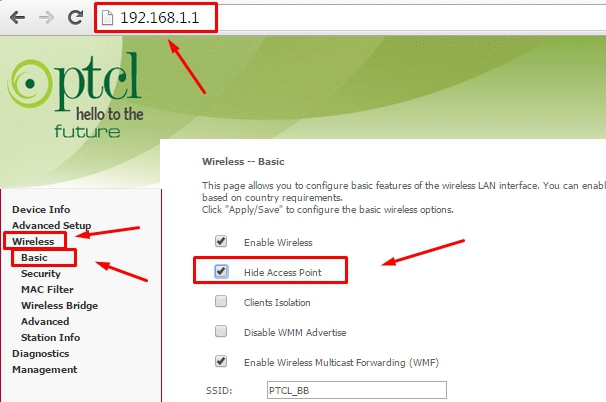
Below you can find the self explanatory images, You just need to follow simple steps to Hide your Ptcl WiFi signals.

1. Visit 192.168.1.1 from your default browser i.e Google Crome
2. Enter Username And Password, In this Case User Name and Password is Admin.
3. Click On Wireless Button.
4. Click On Hide Access Point Check Button.
See below image for reference.
Published from Blogger Prime Android App

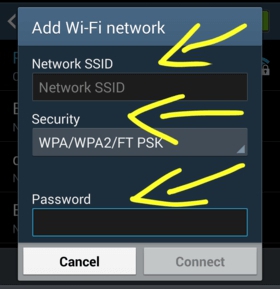
To connect your hidden wifi to your android phone, follow the steps below:

1. Go to your phone Setting> Wi-Fi> Click Add Wi-Fi network

2. In the Network SSID, type your wifi network name.

3. If you’ve enabled wpa in your router then in the security select WPA/WPA2/FT PSK, Look at the screenshot

4. Finally, in the Password box, type your wi-fi password & hit the connect to connect your hidden wifi to your smartphone.

See below image for understanding.
Published from Blogger Prime Android App

Hope that it might be helpful for you. If you think that it is helpful then feel free to drop a comment in the comment form below & don’t hesitate to subscribe to our push notification to get instant tips & tricks & technology news.

Wednesday, 24 November 2021

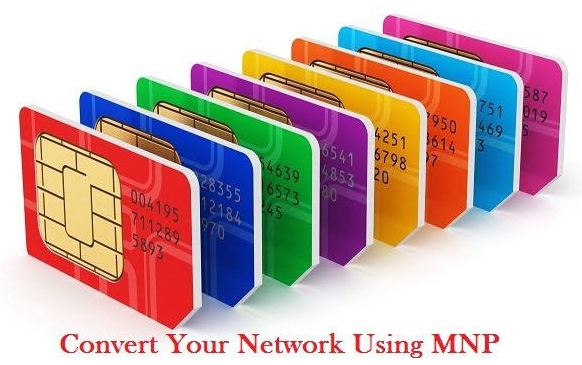
Convert Your Network to Ufone, Warid, Telenor, Mobilink or Zong.

Networks in Pakistan are kept on introducing different packages at different prices. Some found their network call and SMS plans expensive. However, some people are facing the signal problem. There are lot of reasons due to which people decide to change their network. 
Published from Blogger Prime Android App
In this article, You will know that how to Convert Your Network to Ufone, Warid, Telenor, Mobilink or Zong?

How to convert your network to Warid?

1. Write MNP in the text message and send it to 667.
2. It’s reply will ask for your name and CNIC.
3. Write your name and CNIC number and forward it to 76321.
4. Your SIM network will be converted into Warid within 4 days.
5. The users can also dial 0321 321 321 1 to convert their number into Warid.
6. To confirm the conversion, visit the nearest retailer or franchise with your original CNIC, its photocopy and the original SIM.

How to convert sim to Zong?

Zong provides different ways by which you can use its network, the most convenient ways are here for your guidance.

1. Type MNP in a message and send it to 667
2. The reply will be a text message asking your name and CNIC.
3. Write your name and CNIC number in a text and send it to 76313.
4. SIM network will be changed within 4 working days.
5. However, there is an online option also available to convert sim into Zong on Zong’s Official websites.

Zong Offers Online Facility to Convert to Zong Network. Convert Your Number to Mobilink?

1. You can port your number to Mobilink by visiting your nearest Mobilink Franchise/Main Office or selected retailer outlet.
2. Take your original CNIC along with an active SIM to convert your number to Mobilink.
3. The number will be converted in 4 working days.
4. The service is free of cost from the main office. However, Rs 75/- will be charged as MNP fee from franchises and retailers.

How to convert your SIM to Ufone?

1. Type “MNP” and send it to 667
2. Forward the reply to 76333 from that number along with your name and CNIC number.
3. Then Call “03312361236” from the same number you want to convert into Ufone, your port in request will be noted.
4. Then Visit your nearest Ufone franchise along with your CNIC and convert your network to Ufone.
5. This service is free of cost and Ufone also gives Rs. 50 balance to its prepaid customers on first call activation.

How to convert Your Number to Telenor?

1. Send MNP to 667, You will receive a message with your connection details.
2. Forward this message to 76345 with your CNIC number and name.
3. Then Visit your nearest Telenor franchise along with your CNIC and convert your network to Telenor.
4. User will pay Rs. 60 for this process while he will get an initial balance of Rs. 50 when his network will be converted in Telenor.

Tuesday, 23 November 2021

Warid Sim Lagao Offer 2021

Warid is now offering Warid Sim Lagao offer to customers with comfortable and exciting features. Now, all customers who have not used their SIM card in the past 30 days can enjoy free calls, SMS, and Internet Mbs.

Published from Blogger Prime Android App

They will get 3000 Warid minutes, 3000 SMS, and 1500 MB (9 pm to 1 am) in 60 days. In addition, regarding the use of Rs. For 15 or more, customers can also activate additional SMS and Internet MB within 1 day.

As we know that jazz and warid are now merged so their offers and packages are the same. So, this Warid offer is the same as jazz sim lagao offer.

So, this offer is also valid for Jazz customers because now Jazz and Warid are the one network after the merge so it doesn’t matter you have Jazz or Warid sim just dial the code to get the offer.
Users can get 3000 warid minutes, SMS, and the fastest 1500 Mb mobile internet data. Dial *551# to subscribe to this offer. It is only valid if you have not used your sim for the previous 30 days.

Warid Sim Lagao Offer

Here are the details of this offer, you can check them in the below table:

Minutes: 3000 (Warid+Jazz) for 50 mins/day (except 6pm-10pm)

Internet MBs1500 for 60 days (except 9pm-1am)

SMS: 3000

Also, On the usage of Rs. 15 or more, warid customers can also get 50 Warid+Warid minutes, 50 SMS & 50 MBs (except 9 pm-1 am) of internet valid for 1 day.

How to Activate Sim Lagao Offer

Follow the below steps to activate the Warid sim lagao offer.

1. Dial *551# to activate this offer
2. Subscription Charges are Rs. 0.06 (Incl. Tax)
3. After this, the user will get a confirmation SMS that the offer has subscribed successfully.
4. Customers will get 50 Warid + Warid minutes daily for a period of 60 days.
5. Free MB’s cannot consume from (9 PM-1 AM).
6. Minutes will not be usable from (6 PM- 10 PM).

How To check remainings

To check the remaining minutes, SMS and Mbs use the Jazz ecare or Jazz world App.

Terms and Conditions

1. Overage of Rs 1/MB applies for all mobile internet bundles
2. For any information about Warid sim lagao offer, call on Warid Helpline.
3. So Call Sets fee of Rs. 0.10+Tax will be charged on the very first pulse for each and every call.
4. Using SIM without proper documentation is a crime – PTA
5. Unwanted and unreasonable messages can report by texting the SENDER’s NUMBER to 9000 –PTA.

Monday, 22 November 2021

Ufone SIM Lagao Offer August 2021

If your Ufone SIM is inactive from the last 30 days, then you can avail this offer. 
Just switch on your SIM and activate it to get 6000 Ufone to Ufone and Ufone to PTCL minutes with 6000 SMS. You will also get a reward of 6000 MB internet free of cost.

Eligibility Criteria of Ufone Reactivation Offer
The eligibility criteria is as simple. The only term to avail Ufone Band SIM Offer is that you should not have used your SIM for over 30 days.

How to subscribe to the Ufone SIM Lagao Offer?
After confirmation that you are eligible for this offer, just put your Ufone SIM in your phone and dial the code *5000# (no charges applicable).

Free Incentives on Successful Activation
You will get 6000 free minutes, which are useable on Ufone to Ufone and Ufone to PTCL numbers as well. 6000 SMS and 6000 MBs will be posted in your account as well. 50 minutes and SMS with 50 MB internet will be awarded daily into your account, which can be used on the same day. Free incentives will be given for the next 60 days.

Subscription code: *5000#
Free Minutes: 6000 Ufone & PTCL Minutes (50 Minutes Daily)
Free SMS: 6000 (50 SMS Daily)
Free Internet: 6000 MB (50 MB Daily)
Validity: 60 days
Price: Nil

Terms & Conditions
1. This offer is for prepaid subscribers only. 
2. Subscribers will get 50 Ufone/ PTCL minutes daily for a period of 60 days.
3. Bonus on Usage will be provided on usage of at least Rs. 5.
4. Rs.0.12+Tax from day 16th onwards is applicable on all calls made through SLO offer.
5. A customer who has opted/activated this offer before 17th Apr’20, will continue to use SLO without call setup charges; however, bonus on usage minutes will be charged with Rs. 0.12+Tax per call.
6. Customers can subscribe to Internet offer and consume in 2G/3G/4G network areas.
7. No time restriction is applicable to SLO internet usage.
8. Ufone reserves the right to withdraw the offer at any time.

Sunday, 21 November 2021

TELENOR SIM LAGAO OFFER 2021

From this post you will come to know that how to activate Telenor Sim Lagao Offer 2021. You will also know all the benefits and related information to Telenor Free Sim Lagao Offer.

Telenor Sim Lagao Offer 2021:

Telenor offers Sim Lagao Offer for those customers who have not used their sims for 30 Days.
Eligible Customers will get the following benefits for free:
Free Telenor Minutes: 3000
Free All Network SMS:3000
Free Internet MBs: 3000 
You will get 50 Telenor Free Minutes, SMS and MBs daily up to 2 months (60 Days).

How to Check Eligibility:

Before applying, you can check your eligibility by calling to Telenor helpline.

Telenor Sim Lagao Offer Code 2021:

 You get this incredible offer by reactivating Telenor sim on your mobile phone. then dial 2222 to get the offer detail to avail the offer or SMS free to simple code 2222.

Telenor Sim Lagao Offer Balance Check:

If you have successfully activated your Telenor Sim Lagao offer and want to check free balance or want to check free minutes and free internet data, then dial below free code.

Command Codes:

Check free minutes on Telenor: *222#
Check free SMS on Telenor: *111#
Check free internet MBs on Telenor: *999#

I hope you will like this post and also share it with your friends on Facebook and other social media.
Comment below if you face any issue in Telenor Sim Lagao Offer Activation.

Thanks!

Saturday, 20 November 2021

Zong SIM Lagao Offer 2021

Activate your Zong SIM Lagao Offer 2021for free
 Zong always give surprise to its customers with amazing offers, Zong SIM lagao offer 2021 is one of them. 
Published from Blogger Prime Android App

If it’s been 30 days or more since you’ve turned off your Zong sim from the day you read this article, it’s your turn to get 6000 Zong minutes, 6000 SMS to all networks, and 4000 MB internet with 4000 MB data for WhatsApp and that’s absolutely free of cost with reactivation offer. Read the complete article and don’t miss the opportunity. 

Eligibility Criteria
As per Zong official website, customers who have not used their Zong sim from the last 30 days are eligible for this offer.


How to subscribe Zong SIM Lagao Offer?
All you have to do is simply just dial the Zong sim lagao offer code *2244# with no deduction of amount.


Offer Incentives
You’ll be rewarded with 6000 Zong minutes, which can be used on Zong numbers only along with 6000 SMS for all networks in Pakistan. 100 minutes and SMS will be allocated to your account every day for the next 60 days.
Moreover, with the new Zong band sim offer, you’ll also be given 4000 MBs internet and 4000 MBs for WhatsApp. 2000 MBs internet and 2000 MBs for WhatsApp will be provided on the first day of Sim lagao offer activation, while the next 4000 MBs will be provided again on the 31st day of this offer.

Subscription Code: *2244#
Free Minutes: 6000 (100 minutes per day)
Free SMS: 6000 (100 SMS per day)
Free Internet: 4 GB
Validity: 60 days
Price: Nil


How to check reaming incentives?
You can get the information about your free resources by dialing the following codes:
To Check Free Minutes: *102*2#
To Check Free SMS: *102*3#
To Check Free Internet Data: *102*4#

Rs:0.10+Tax will be deducted from your account on dialing any of these codes each time. But did you know that you can check your remaining minutes, SMS, and MBs free of cost? Check below procedure.


How to check remaining minutes, SMS, and MBs free?
You will have to download My Zong App to check remaining minutes, SMS, and internet for free. My Zong App is available on the Play Store. You can download it easily and after successful registration, you’ll be welcomed with 1 GB free internet for 3 days by Zong.


Terms & Conditions of Zong SIM Lagao offer:
1. Offer is available for prepaid subscribers only.
2. Subscribers with Zong 20, Zong 30 and Zong Economy package, can avail this offer.
3. Any customer who has not used Zong SIM for the last 30 days can avail this offer.
4. 100 Zong minutes and 100 SMS daily will be given in Zong sim lagao offer for a period of 60 days.
5. Customers will get 4000 MBs on the first day and 4000 MBs on the 31st day. Data incentive validity is 30 days and will not carry forward to next month.
6. Incentive posted can be consumed after 4:00 AM.
7. Subscriber will be eligible if he/she is 30+ days dormant (30 days to 360 days dormant).
8. If a customer has already avail re-connection, then the number will not be eligible for the next 180 days.
9. No Call Setup charges are applicable.

Monday, 29 March 2021

Mac Address of your self phone.

 How to find out your self phone mac address?

Hello friends, Most of people are not known to the method of finding their handset mac address which are required to connect to an internet at different network. 

How ever it is very simple and easey to understand its method. I will share with you a very simple method. Just follow the following steps;

1. Open the menu of you mobile phone.

2. Go to setting.

3. Select connection option.

4. Press and hold few seconds on Wi-Fi option.

5. Select the three dots column located on the top right most side.

6. Click on advanced option.

7. Scrol down the list and you will find the Mac address written in the bottom.

Thats it.

Still if there is any problem, ask me anytime. I will be here for your help.


Sunday, 10 February 2019

Different ways to earn money through internet

Hello everyone, today I am going to share the different ways to earn money online. Most of  people want to look for such a source of income which would't need too much hard work.


Here are the different ways which I think that could earn you money quickly with the help of internet usage.

1. Create a downloadable product to sell

Put together a simple guide or ebook using pdf software, and your knowledge. Sell the product via your blog or site.

2. Sell your stuff

Things you have that don’t really get used much, including things in the garage and your attic, can be sold online, on eBay, or even at a garage sale.

3. Create a physical product for selling

It depends on what skills you have that would allow you to make quick products, people would like that could be sold at craft markets like Etsy or Ebay.

4. Offer services through online classifieds and freelance sites

Use your skill as a freelancer or something else you’re good at, and offer your services online. Classifieds sites like Craigslist and Elance are places to place ads and to find people needing your services.

5. Consult

People want to pay you for your knowledge and experience.  You could set up a site or use an existing one to answer questions for a charge. Set up a PayPal link and get paid instantly before sending over an answer.

6. Resell stuff online

There are some great profits to be made on buying products for cheap somewhere and reselling them elsewhere, namely online.

7. Create graphics and themes

You could create graphics including logos, templates, icons, buttons, web elements, wordpress or Tumbler themes, book covers, blog themes and illustrations for digital marketplaces like Graphic River or Template Sold.

8. Advertise different products on your blog

If you have a good means to market products, via a blog or a mailing list. You could sell affiliate products and earn a commission on each sold.
Clickbank and Amazon Associates (as well as right here in Red Lemon Club!) are places to go to find products to sell on behalf of others.

9. Write for other blogs or websites that pay

Many people do pay for decent quality written content. Have a hunt around for places that need you to write articles, ‘How-To’s’, tutorials, product and service reviews, stories, interview, and so on.

10. Earn through YouTube videos

Create videos for popular sites like YouTube and sell your own stuff, merchandise or affiliate products via links under the videos.If you have a really popular video, you can earn from the advertisements YouTube place next to it as well.

11. Sell quick services on Fiverr.com

You could provide a service that doesn’t take too much out of your day via Fiverr, a site that costs users five dollars for jobs other members provide.

12. Sell ad space on your site

If you have a site with a nice traffic coming through it, ask around (people who know you first) for those willing to pay for a banner, text or other ad on the site. Buy Sell Ads is a great tool for automating this process.

If you have any other good idea, then feel free to share with us.
Thanks.

Thursday, 7 February 2019

How to limit the speed of a user over your router

Method to control the speed of someone over router


Hello everyone, today I am going to show you how to control the speed of any IP address user just in few steps. It is necessary when someone is consuming most of internet speed. Following are the main steps to control it.
1. Login to your WiFi admin account. i.e. 102.168.1.1 or it can be different.
2. Go to Advanced setup.
3. Select Bandwidth Control.
4. Type the IP address of the user, whose speed is to be controlled.
5. Give the amount of uploading and downloading speed. i.e. up speed can be 10-50 and down speed can be 50-max limit.
6. Click Add and then Save it.
7. Click Apply button.
That is a very simple method and it is used when you need a max speed for yourself. 

Saturday, 15 December 2018

How to put ads into your blog/website?

Our ad server can display ads on all blog platforms, web authoring software and content management systems (CMS) via a widget or template interface. These are instructions for some of the popular ones: WordPress, Blogger, TypePad, Joomla, Mambo, Ning, DotNetNuke.

Blogger
Copy the serving code of the zone or a specific ad
Go to the dashboard of your blog
Click "Layout" tab to edit it
Click "Add a Gadget" (either on the side or at the bottom)
Under the Basics list, choose the HTML/JavaScript
Paste the serving code to the Content box, and click Save
TypePad
Copy the serving code of the zone or a specific ad
Sign into your Typepad account, and select the blog you want to add the widget to
Choose the "Typelist" option tab at the top of the page
Choose the "Create a New Typelist" option on the right
Choose Notes as the list type, and a name for your new list
Paste in the serving code
Click Publish tab and then choose your blog Save/Republish.
Joomla
You can display ads with AdSpeed Ad Server Module for Joomla or manually integrate the ad tag with the instructions below:
Copy the serving code of the zone or a specific ad
Sign into your Joomla account. Go to the dashboard of your website
Click "Extentions"
Choose "Module Manager"
Click the "New" button
Under the list, choose "Custom HTML"
In the Custom Output part, click "HTML"
Paste the serving code to the HTML source editor, and click Save
Mambo
Copy the serving code of the zone or a specific ad
Sign into your Mambo account. Go to the dashboard of your website
Click "Modules"
Choose "Site Modules"
Click the "New" button
In the Custom Output part, click "HTML"
Paste the serving code to the HTML source editor, and click Save
Ning
Copy the serving code of the zone or a specific ad
Sign into your Ning Network account
Paste the serving code into a text box or a page
Remember when using the text editor, you should click on the HTML button to bring up the HTML view and paste the HTML serving code in there directly
DotNetNuke
Copy the serving code of the zone or a specific ad
Login to your DNN admin account
Add a Text/HTML Module to any page, or choose an existing module
Click "Edit Text" and make sure you are working with the HTML source
Paste the HTML serving code into the text box and Save.

Another simple Method:

Go to
1. The home page of your blog.
2. Select theme.
3. Select edit HTML
4. Find <head>.
5. Past the code of your Ad anywhere below <head>, but it should above the </head>.
6. Select Save theme.

That's all!!!! 

Friday, 14 December 2018

Weekly 3G and 4G internet packages in Pakistan

Since the launch of 3G/4G in Pakistan in 2014, we have witnessed a massive increase in mobile data usage. Telecom operators are also much more focused on bringing multitudes of time and usage based internet packages, catering to the needs of all types of users.


For our readers, we have made a comparison of all the time and usage based 3G/4G packages offered by all of the major telecom providers in Pakistan. We have categorized all the 3G/4G packages on weekly bases.

Weekly 3G/4G Internet Packages

Further Information


  • There are no charges to check status of bundle via using codes.
  • Prices are inclusive of applicable taxes. (If any).
  • All the features don’t activate automatically need to re-activate if you want to use once again.
  • If users are not activated to any 3G buckets so they will be charged according to default rates XYZ PKR  per MB.
  • The rates and tariffs can be changed at anytime without any notification.


Sunday, 9 December 2018

Monthly 3G/4G internet Packages of different Networks

3G/4G internet Packages on monthly basis


Since the launch of 3G/4G in Pakistan in 2014, we have witnessed a massive increase in mobile data usage. Telecom operators are also much more focused on bringing multitudes of time and usage based internet packages, catering to the needs of all types of users.


For our readers, we have made a comparison of all the time and usage based 3G/4G packages offered by all of the major telecom providers in Pakistan. We have categorized all the 3G/4G packages on monthly bases.

 Monthly 3G/4G internet Packages


Further Information

  • There are no charges to check status of bundle via using codes.
  • Prices are inclusive of applicable taxes. (If any).
  • All the features don’t activate automatically need to re-activate if you want to use once again.
  • If users are not activated to any 3G buckets so they will be charged according to default rates XYZ PKR  per MB.
  • The rates and tariffs can be changed at anytime without any notification.

Saturday, 8 December 2018

Daily 3G/4G Internet Pakages of different Networks

Choosing appropriate 3G/4G Internet Package in Pakistan

Since the launch of 3G/4G in Pakistan in 2014, we have witnessed a massive increase in mobile data usage. Telecom operators are also much more focused on bringing multitudes of time and usage based internet packages, catering to the needs of all types of users.

For our readers, we have made a comparison of all the time and usage based 3G/4G packages offered by all of the major telecom providers in Pakistan. We have categorized all the 3G/4G packages on daily bases.

Daily 3G/4G Internet Packages


Further Information
  • There are no charges to check status of bundle via using codes.
  • Prices are inclusive of applicable taxes. (If any).
  • All the features don’t activate automatically need to re-activate if you want to use once again.
  • If users are not activated to any 3G buckets so they will be charged according to default rates XYZ PKR  per MB.
  • The rates and tariffs can be changed at anytime without any notification.


Monday, 21 May 2018

How to remove a specific label from many posts at a time

Hi friends, hope you are doing well. Most of the time when someone want to remove a specific label from many post, it seems quite difficult and time wasting to remove a specific label from each post one by one. Here, I am going to share a sample way to remove any label from many post at a time. It is quite easy and simpler for anyone. Now, just follow up the following few steps and make it done within a minute.
Steps:
1. Login to your blog account.
2. Go to post and click on “all”.


3. Go to drop down list located at the left side of the search bar in the right sided upper region.


4. Select the label which you want to remove.
5. Select those posts from which you want to remove a desired label.
6. Go to the drop down list located at left side of “Publish” option.


7. Click on the specific label for remove or addition purpose.

That’s all !!!
Thanks.

Thursday, 28 September 2017

How to add Announcement / Breaking news to your blog?

It is common that in every webpage, there are some necessary updates which need to be highlighted. But when it comes to announcement, then it needs to be highlighted at the front line for everyone. Today I am going to share a simple trick to make a breaking news menu at the front page of your site / blog. Simply, just follow up the following steps;
Steps:
1. Login to your blogger account.
2. Go to Layout.
3. Add a Gadget.


4. Select HTML/ JavaScript.


5. Paste the following code in “Content” section.
<marquee bgcolor="#6D6669"><font color="#ffcc77"font size="3px">You can place your announcement/breaking news here. </font></marquee>
6. Give a name to its title.
7. Save it.
That’s all !!!
Thanks.

Thursday, 21 September 2017

How to block specific sites in Chrome?

Blocking sites on your browser is important in case when your system is used by many others i.e. Kids etc. But sometimes, when you got a problem with your PC. I mean when some sites open automatically by your browser. Then it is annoying to everyone. It is simple to get rid of it by following up the given steps.
Steps:
1. Open your browser.

2. Click  BlockSite .

3. Add it to your Chrome.

4. Then, go to the 3 dotted column located at the top right most position and select “More Tools”.

5. Select Extensions and enable BlockSite extension.


6. Go to its option.

9.   In “Blocked Sites”, you can add the URL of the site you want to block by clicking ADD Page.

10. Once you add it. Then you can refer it to other site by clicking a row of 3 dots in front of the site
      and adding the URL  for referring.

11. In Protection option, you can set a password of your choice on it.


That’s all!!!
Hope it works for you.
Thanks.


Wednesday, 20 September 2017

How to open Chrome in different screen modes by default?

There are different modes of chrome. Everyone have a different selection mode when it comes to opening of chrome during startup. I.e. half screen mode, Full screen mode, maximized full mode etc. 
Opening chrome with full screen mode or the other one you want is pretty simple. You just need to make some changes in the path of the Chrome shortcut located on your PC screen.

To make it enable, just follow up the following simple steps.
Steps:
1. Go to the properties of the Chrome Shortcut by right clicking on the shortcut of Chrome.
2. Go to “Target” option and edit the path of Chrome Shortcut.
3. Mode:
      Full Screen Mode:
       Past “ --start-fullscreen” after .exe”.
       i.e.  "C:\Program Files (x86)\Google\Chrome\Application\chrome.exe" --start-fullscreen
       OR
       Maximized Mode:
        Past “ -start-maximized” after .exe”
        i.e.  "C:\Program Files (x86)\Google\Chrome\Application\chrome.exe" -start-maximized

        Note: Giving space after .exe” is necessary for both modes.
4. Select “Apply” then select “Continue”.
5. Save it by Clicking OK button.
You can disable full screen mode by Pressing F11.
That’s all.
For further quarries, Comment in the box below.
Thanks.


Monday, 18 September 2017

How to change your search engine in browser

Friends, Sometimes you might have noticed that when you search something with search engine of your browser. You will find a completely different search result as compared to google search engine. It seems very annoying to most of our friends. But it happens sometimes. Today, I am going to share a simple solution for this problem.


 It is very simple to change the search engine of your browser. Just follow up the following Steps.

Chrome:

Steps:

1. Open you browser.
2. Go to Option.
3.  Go to “Mange search engine”.
 You will find two Sections: Default search options and other search engines.
In the Default search options:
Delete the current Google search option but you will have to select a different Default search before Google can be deleted.
In the other search engine section: Add a new search engine i.e. Google (or the one you want)

Keyword: google.com
URL: https://www.google.XXX/search?hl=en&q=%s&meta=
Change the XXX to the search site you want so add .com or .co.uk or .es etc.
After finishing it, Make it Default.
That’s All.
For further quarries, comment in the box below.

Friday, 8 September 2017

How to connect your Android phone to WiFi without any password?

 Hey friend, Hope you are doing well. Normally, whenever you are somewhere else and there you find a WiFi network on your phone but unluckily, when it requires a password. Then what will you do in order to connect to it? Simply ask the owner for the password.
 But if the owner is somewhere else or etc. Then it’s time for you to show your skills. Today, I want to share a simple trick for this problem. Just follow up the following steps.
Steps:
1. Go to setting in your phone.
2. Tape on WiFi.
3. Go to “Advanced WiFi option”.
4. Tape on WPS push button.
5. Press WPS/Reset push button of your router/modem.
Once you press the WPS button, WPS LED will glow and your phone will connect to WiFi in a couple of seconds without password to the targeted WiFi network.
That’s all!!!
For further quarries, please comment in the box below.
Thanks.

Friday, 1 September 2017

How to sign in with a local account instead of Microsoft account in Windows 10?

Hey friends, It is very common that whenever you login to your play store account in order to download some apps/games from store and then after finishing your downloads from play store, you will be asked every time to login with Microsoft account every time you power on your PC. Probably, No one want to login every time with Microsoft account. It is very simple to get rid of it. Today, I am going to share a simple trick for its solution. Follow up the following few steps and get rid of it.
Steps:
1. Go to flag icon located down at the left-bottom on your PC screen.
2. Select setting option.
3. Select Accounts.
4. Select “sign in with a local account instead”.
5. Give password of your Microsoft account and select next.
6. Give a new password for your local account in top two bars.
7. Give a hint for password remembrance in case you forget it.
8. Click next and then click on “sign out and finish”.
That’s all !!!
Here is the demonstration link for it.
For further quarries, comment in the box below.
Thanks.

loading...